Sculpted 3D Gel Art: Raised Flowers, Bows and Small Details
By the Nove Academy Team | Nove Wholesale
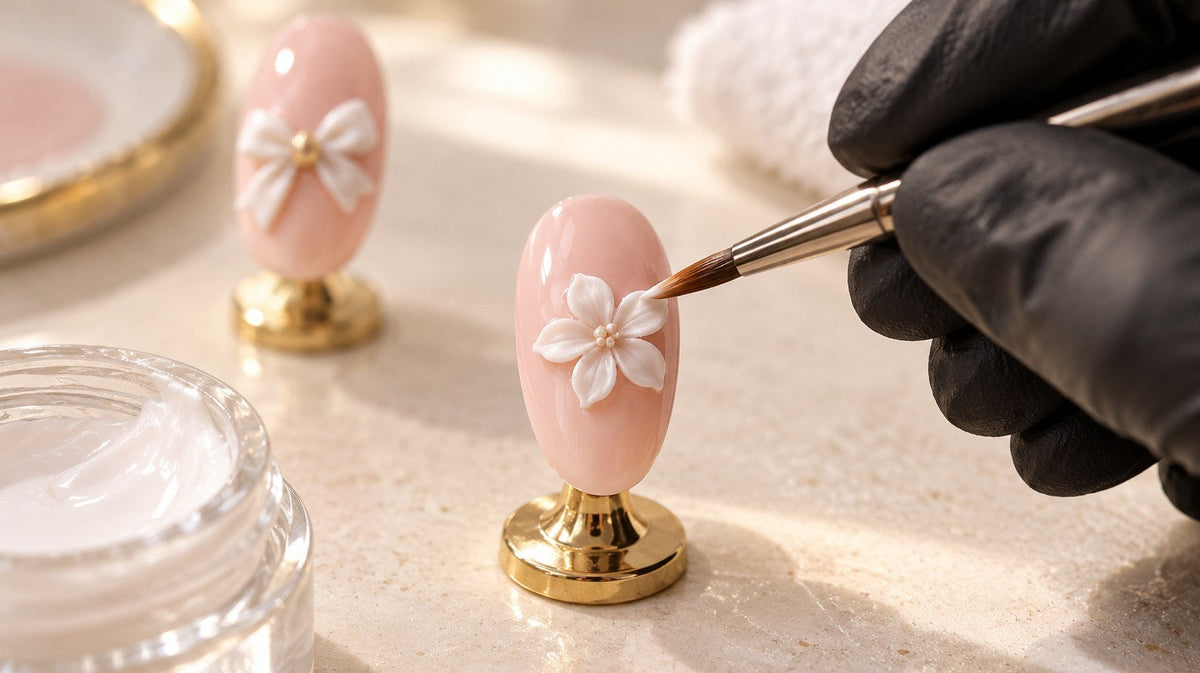
A small raised flower or bow can change the whole feel of a set. Light catches its edges, the shape has a little depth, and one accent nail suddenly has its own personality. The trick is to keep the detail clear and comfortable instead of adding height for the sake of it.
Think of raised art as a few simple shapes that work together. Let’s look at flowers, bow loops and small accents, with practical ways to plan the size and placement before you start sculpting.
The quick answer: Choose one small focal detail, break it into simple parts, and check both the top view and the side profile. Use a sculpting material in its intended system—Akzentz Gel Art Powder is listed for mixing with Options UV/LED Color Gel—and follow its current professional mixing and cure directions. Keep the artwork low enough for the client’s routine and leave room around the shape.
Choose raised art for the right effect
Painted art changes the look of a surface; sculpted art changes its shape too. That makes a small raised motif a good focal point. Ask whether the client likes a smooth finish or enjoys a little texture before planning a whole set around it.
A flower, bow or small leaf does not need to cover the nail. One clear detail beside a quieter color can be easier to appreciate than several raised shapes competing for attention. Consider work, gloves, hair and clothing as well as the reference picture.
Akzentz Gel Art Powder is the sculpting powder listed for mixing with Options UV/LED Color Gel to make raised designs. It gives this artwork a different role from a premade charm or flat painted flower; keep the exact Akzentz mixing and cure directions beside your setup.
Pro Tip from Nove Academy: Ask the client to show you the height they are comfortable with from a side-view reference, not only a photo taken straight above the nail.
Break the motif into simple shapes
For a flower, think about a small center and a few petal shapes around it. A petal can read as an oval with a gently defined center, so you can suggest a flower without sculpting every fold. Plan the outer outline first, then decide which inner details are actually visible at nail size.
For a bow, start with two loops and a small center knot. Compare the loops as a pair: their height and width should feel connected even when the bow sits on an angle. Keep the knot distinct rather than burying it beneath extra material. Long tails are optional; the two-loop silhouette may already say enough.
Options Gel Art White is a highly pigmented true white within the Options Color range named in the powder instructions. A pale motif can make the petal outline easy to see against a deeper background. Use the directions for the combined powder system rather than treating plain color-gel timing as a sculpting recipe.
Flower: center, a few petals, then only the folds needed to explain the shape.
Bow: two balanced loops, a distinct knot and optional short tails.
Leaf or small accent: one clear outline and a restrained center detail.
Use the brush to refine the silhouette
A matching sculpting brush helps you work on the outline, the center and the separation between parts. With your maker-directed mixture and trained technique, concentrate on a few deliberate shapes. Continually fussing with tiny folds can make the motif busier without making it clearer.
The pointed Akzentz 3D Gel Art Brush #6 is intended for Gel Art Powder. Its natural bristles taper from a 5 mm base to a point, giving you the brush shape named for this material; the included cap helps protect it between uses.
Pro Tip from Nove Academy: Before adding another crease or petal, look at the design from the client’s normal viewing distance. If the shape is already clear, that extra detail may be unnecessary.
Plan a low, wearable layout
Use a practice tip to map the footprint before a client service. Leave a little quiet background around the motif, and look from the side as well as from above. A detail that fits in the top view can still feel too bulky in profile.
Choose one motif and mark its footprint on a practice-tip sketch.
Separate it into petals, paired loops or another few simple parts.
Compare the largest parts before adding small accents.
Check the side profile and simplify anything that projects awkwardly.
Use the current Akzentz procedure and your training for the actual mix, application, cure and finish.
Review the finished profile and comfort with the client before they leave.
A small Nove Mixing Jar gives you a separate place for a maker-directed practice mixture. It keeps the work apart from the original color pot; use a clean tool, label any retained material and follow Akzentz guidance for handling and storage.
Use only the mixing partner and procedure specified for the exact material. Ratios and cure schedules belong to the product instructions; adding extra powder or extra thickness to force a shape is not a substitute for the correct method. Keep uncured material off the skin and follow the powder’s safety data sheet for handling.
Fix the design before adding more detail
The flower reads as a mound: make the planned center and petal outline more distinct rather than adding another layer.
The bow looks uneven: compare the size and angle of the two loops before refining the knot.
The detail overwhelms the nail: reduce its footprint or leave the neighboring nails simpler.
The profile looks easy to catch: lower or simplify the idea and discuss whether a painted version would suit the client better.
Use a fresh practice attempt to compare one change at a time. You will learn more from three small flowers with different petal spacing than from constantly reworking one complicated design.
Pro Tip from Nove Academy: Save a top-view and a side-view photo together. The first records the composition; the second records the profile you and the client found comfortable.
Let the raised detail lead the set
Carry one color or simple shape onto another nail if you want the set to feel connected. The supporting nails can stay smooth and quieter. The focal detail does not need crystals or extra decoration around every edge to look complete.
Follow the system’s finishing and removal directions and explain how the client should have the art adjusted or removed. They should not pry a raised piece away at home. If a detail becomes loose or uncomfortable, have them contact their technician rather than pull at it.
A Few Common Questions
How do I keep a raised flower from looking bulky?
Plan a small footprint, keep the petal outline clear and check the side profile. More petals and more height do not automatically make the flower easier to read.
What makes a small bow recognizable?
Two related loop shapes and a distinct center knot do most of the work. Keep extra folds or tails only when they help the silhouette.
Which Akzentz products belong to this powder system?
The Nove Gel Art Powder directions name Options UV/LED Color Gel as a mixing partner. Akzentz identifies its pointed 3D Gel Art Brush #6 for use with the powder. Follow the current complete procedure for the combination.
Can I use my regular gel-polish cure time for raised art?
Use the full directions for the exact sculpting material, mixture and lamp. A plain color coat and a dimensional design are different applications; do not guess a ratio, thickness or cure schedule.
Does every nail need a raised detail?
No. One focal nail with quieter supporting colors can make the dimension stand out more clearly.
What should a client do if a raised detail catches?
Contact the technician for an assessment or adjustment. Do not pull or pry it away at home.
Make the shape clear before making it bigger
Start with a flower, bow or accent you can recognize in a few simple parts. Keep the profile practical, use the intended material system and let the rest of the set give that detail room. Thoughtful scale makes small raised art feel intentional.
Explore our Nove Academy Guides for more practical product and technique advice, or ask the Nove team for help choosing products for your service.
Professional education from Nove Academy. Follow your training and the current instructions for your exact products and equipment. Product availability can change.


 ellpellz
View all reviews on Google
 Rowan Jeancart
 Kathy Heynemans
 ML M
 Morgen Schick
 Sydney Kolbeck
 sidra Akram
 Dinelle Lajeunesse
 Amanda Dietrich
 Trudy Sands
 lou gaudet
 Dean Prediger (Preds)
 Jessica Hueser
 Ashlyn Evans
 Shekinah Petten
 Shayla Millar
 blaze
 Kela Groeschel
 Shantell Redlick
 Hayley-Rae Gardipy
 Kim Calvert
 Rachel Mcgonigal
 Diane Newton
 Alissa Gaudet