
They have an abundance of great things to buy. The employees were very kind and helpful I will be coming back!
 Jessica Hueser
View all reviews on Google
Jessica Hueser
View all reviews on Google
Sometimes a tip fits beautifully and gives you a useful starting shape. Sometimes a form gives you the freedom to build the extension exactly where you want it. Knowing when to reach for each makes the choice much easier.
The best starting point is the nail in front of you: its width and curve, the length your client wants, and the system you know how to use. Let’s look at the options, the fit checks that matter, and a few products available at Nove.
The quick answer: Choose tips when you have a suitable fit and a supported application system. Choose sculpting forms when you want to build the extension shape yourself and can fit the form securely. Both methods need comfortable fit, thoughtful structure, and a length the product and client can support.
“Tips versus forms” sounds like a choice between two methods. In practice, tips include different formats, and they should not all be applied the same way.
A partial-cover tip adds a starting extension at the free edge. You then complete the enhancement with the appropriate structural product. The tip’s shape is a starting point; it does not replace building the support the finished nail needs.
Check before using: The contact area, fit, recommended adhesive, preparation, and compatible overlay system.
These cover the natural nail and provide a pre-shaped extension. Use the manufacturer’s supported attachment routine, including any underside preparation, bonding product, lamp, and complete cure sequence.
Check before using: Width, curvature, cuticle fit, length, and the exact system instructions. A full-cover tip is not automatically a press-on, and a product called soft gel does not tell you which adhesive to use.
A form temporarily supports the extension while you build it with a suitable gel or acrylic. It is removed at the stage specified by the system, leaving the sculpted product in place.
Check before using: How the form fits beneath the free edge, its stability and alignment, and whether the sculpting product supports the planned length.
Pro Tip from Nove Academy: When discussing a service, say “traditional tips with an overlay,” “full-cover soft gel tips,” or “sculpted extensions.” Clear names help your client understand the appointment and help you choose the correct supplies.
Begin with the client’s desired length, daily activities, and natural-nail shape. Then ask which method gives you a comfortable fit and a service you can complete confidently.
Neither method wins every time. Your skill, the product system, and the quality of the fit all matter.
Check every nail individually. Matching fingers on opposite hands do not necessarily need the same tip size.

Profiles Stiletto 1/2 Well Tips: A Traditional Extension Option
Look here for: Clear ABS tips with a stiletto shape and a half-well contact area, in a 500-piece assortment.
Keep in mind: These are partial-cover extension tips. Fit and attach them using the supported routine, then complete the appropriate overlay and structure.

Coconoir Short Square Full-Cover Tips: A Pre-Shaped Option
Look here for: A short square shape in a full-cover soft gel format, with 550 pieces in this pack.
Keep in mind: Confirm the complete Coconoir attachment and curing instructions before use. Choose the fit for each nail rather than choosing by shape alone.
Pro Tip from Nove Academy: Save the tip sizes in your client notes, but check them again at the next appointment. A size list speeds up selection; it does not replace looking at the current fit.
A form gives you a place to build, so its position deserves attention before you open the gel. Fit it to the natural nail and planned shape rather than relying on the printed lines alone.
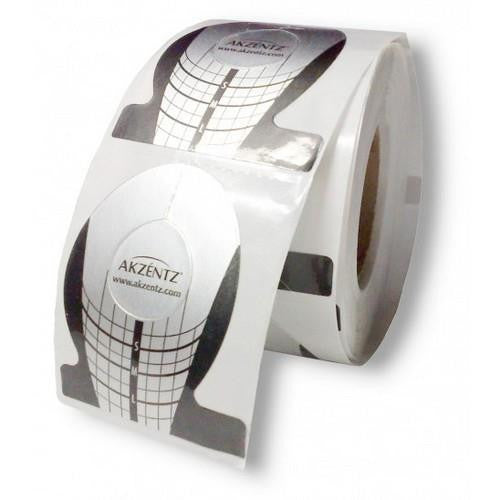
Akzentz ProTab Forms: A Short Sculpting Option
Look here for: Short sculpted enhancements. ProTab forms have a locking tab beneath the form and printed guides, with 300 forms per roll.
Keep in mind: The design can simplify fitting for many clients, but you still need to assess each nail. “Easy to fit” does not mean every opening will suit every client without adjustment.

Akzentz ProSculpt Forms: More Room for Longer Work
Look here for: Medium and longer sculpted extensions. These forms use sturdy, flexible paper, a high-contrast working area, and a straight-edge closure.
Keep in mind: Match the intended length to your sculpting product and structure plan. The printed guide helps with placement; it does not assess the client’s nail for you.
Pro Tip from Nove Academy: Practise fitting forms before practising a complete set. Looking from above, from the side, and along the extension helps you spot alignment changes while they are still easy to correct.
Once the tip or form is fitted, think about the finished nail as a whole. Length, shape, and product placement need to work together.
Our builder gel guide explains working consistency and service selection. For curing and application habits, see Safe Gel Application.

Magic EasyShape Forms: Detailed Guides for Sculpting
Look here for: Aluminum-paper forms with detailed shape guides, supplied in a 300-piece roll.
Keep in mind: Compare the feel and fit with the forms you already use. A stable starting position and controlled product placement still do the important work.
Check: Both size and curvature.
Next step: Try another size or profile, or choose a different extension method. Comfortable fit should come before attachment.
Check: The opening, closure, and whether the form shifts when the client moves.
Next step: Refit before placing product. A slipping form is easier to correct at the fitting stage than after you have started the extension.
Check: Tip placement or form alignment from above and from the side.
Next step: Correct the starting position before building. Filing alone may remove support without correcting the original placement.
Check: Where the failure occurs, the starting fit, product structure, cure, and client’s length choice.
Next step: Review the whole service using our lifting troubleshooting guide. Avoid blaming tips or forms without checking the rest of the routine.
Pro Tip from Nove Academy: Take a quick look at the set before colour: lengths, sidewalls, and overall balance. It is a useful pause that can save a lot of finishing work later.
Neither is better for every client. Choose the method that gives you a suitable fit, supports the planned service, and works with your training and product system.
No. Traditional partial-cover tips provide a starting extension that is completed with an overlay. Full-cover soft gel tips cover the natural nail and use their own supported attachment and finishing routine.
Check the manufacturer’s customisation instructions. A larger tip may be refined where permitted, but do not force a smaller tip to fit or file the natural nail narrower to accommodate it.
Use a builder that is intended for sculpted extensions at the planned length. The word builder alone does not establish that a product can support every extension service.
They can be an option when an appropriately customised form can be fitted comfortably and the service is suitable. Very short or bitten nails need careful assessment and fitting; do not push the form into skin to make it stay.
That depends on the product, not the form. A non-soak-off hard gel requires its prescribed filing removal method; a soak-off system follows its own removal instructions.
A well-chosen tip or well-fitted form gives you a useful starting point. From there, keep the length realistic, the structure intentional, and the application routine consistent.
Need help choosing supplies? Tell the Nove team whether you use traditional tips, full-cover tips, or forms, which product system you work with, and what you would like to improve. Those details help us narrow down useful options.
Professional education from Nove Academy. Follow current instructions for your exact tips, adhesive or gel, forms, and lamp. Brand examples explain their own systems and do not establish compatibility with another brand.

4.8 from 144 Google reviews
They have an abundance of great things to buy. The employees were very kind and helpful I will be coming back!
Jessica Hueser
View all reviews on Google
Whenever I walk in there I am warmly welcomed and they are always willing to help me out! Whether that be finding something, or just questions about a certain product!
 Ashlyn Evans
View all reviews on Google
Ashlyn Evans
View all reviews on Google
The ladies who work here are absolutely amazing and so kind!
 Shekinah Petten
View all reviews on Google
Shekinah Petten
View all reviews on Google
LOVE IT HERE! The educators are so good! So happy I chose to go to school at NOVE academy!
 Shayla Millar
View all reviews on Google
Shayla Millar
View all reviews on Google
Nove is an amazing school, Amanda is an excellent teacher and the product is always stocked.
LOVE NOVE!!! instructors, environment everything. THE BEST!!❤️❤️❤️
 Kela Groeschel
View all reviews on Google
Kela Groeschel
View all reviews on Google
Great customer service!
 Shantell Redlick
View all reviews on Google
Shantell Redlick
View all reviews on Google
Today’s experience was great! I was able to park in staff parking as students took all the spots lol. Got all the goodies. Thanks Nove ⚡️
 Hayley-Rae Gardipy
View all reviews on Google
Hayley-Rae Gardipy
View all reviews on Google
Absolutely love the amazing service. My kind of girls! So helpful!!
 Kim Calvert
View all reviews on Google
Kim Calvert
View all reviews on Google
The staff are always very welcoming and helpful. I’ve been going for years and recently popped in to grab some lash extension supplies for a new spa member - they were very helpful in giving me selections and recommendations of everything we needed to get her set to. Really appreciate their help.
 Rachel Mcgonigal
View all reviews on Google
Rachel Mcgonigal
View all reviews on Google
Always a pleasure to shop at Nove!
 Diane Newton
View all reviews on Google
Diane Newton
View all reviews on Google
The nicest ladies and gents I have had the pleasure of dealing with at nail shop. They treat you like family members and always have amazing suggestions! If you have the chance to get product here pleaseee dooo
 Alissa Gaudet
View all reviews on Google
Alissa Gaudet
View all reviews on Google
Always excellent staff and service, so helpful to find things I need 😊 my go to nail shop
 Mikayla Brown
View all reviews on Google
Mikayla Brown
View all reviews on Google
Owners are very kind and professional. Store was clean
 Simon Mascho
View all reviews on Google
Simon Mascho
View all reviews on Google
Always a great experience going in! Very helpful in finding the ‘exact’ color I’m thinking in my head 😂 the ladies at the front are always fantastic to chat with and give great options/advice.
 Candace Wiebe
View all reviews on Google
Candace Wiebe
View all reviews on Google
Great service
 Nicole Danchak
View all reviews on Google
Nicole Danchak
View all reviews on Google
My favourite place to buy nail supplies! Lovely ladies and the store is always clean and fully stocked
 Ashley Ferguson
View all reviews on Google
Ashley Ferguson
View all reviews on Google
Everyone there is so knowledgeable and is willing to help with any questions I have! I will be continuing to buy my products there!
 mercedes prosofsky
View all reviews on Google
mercedes prosofsky
View all reviews on Google
They are extremely helpful and know the products very well! I always love coming to the store and appreciate the knowledge friendly staff!!
 Allison Pasitney
View all reviews on Google
Allison Pasitney
View all reviews on Google
I always get my salon essentials here, and they consistently have everything I need. The staff is friendly, helpful, and always great to deal with. Definitely my go-to wholesale place for salon supplies!
Always so helpful and the best selection!
 Cara M
View all reviews on Google
Cara M
View all reviews on Google
10/10 would recommend to a friend! Love my visits at Nove Wholesale 🤍
Hayley-Rae Gardipy
View all reviews on Google
I recently took my gel nail technology course and Pam was a fantastic and patient teacher! Melody also has helped me out in picking out products to get me started and build my collection of products and colours! Nove carries a larger selection of brands and items which is nice for different options.
 Julia Gassner
View all reviews on Google
Julia Gassner
View all reviews on Google
I love nove and how helpful the workers always are! Their nail art classes are fantastic and I always learn a lot
 Bum Head
View all reviews on Google
Bum Head
View all reviews on Google
 blaze
blaze
 A
A